MHWC Vanguard - Chris, Post 2

Weeks 2-3: After spending the first week cleaning and spraying, I was ready to start painting.
I like to start most projects by looking on the net for other inspiration. The standard colour scheme seems to be a red skin tone for the Abyssals and all the pictures I could find showed very traditional red demons with bone coloured horns & fangs and steel weapons.
Which all seemed a bit dull.

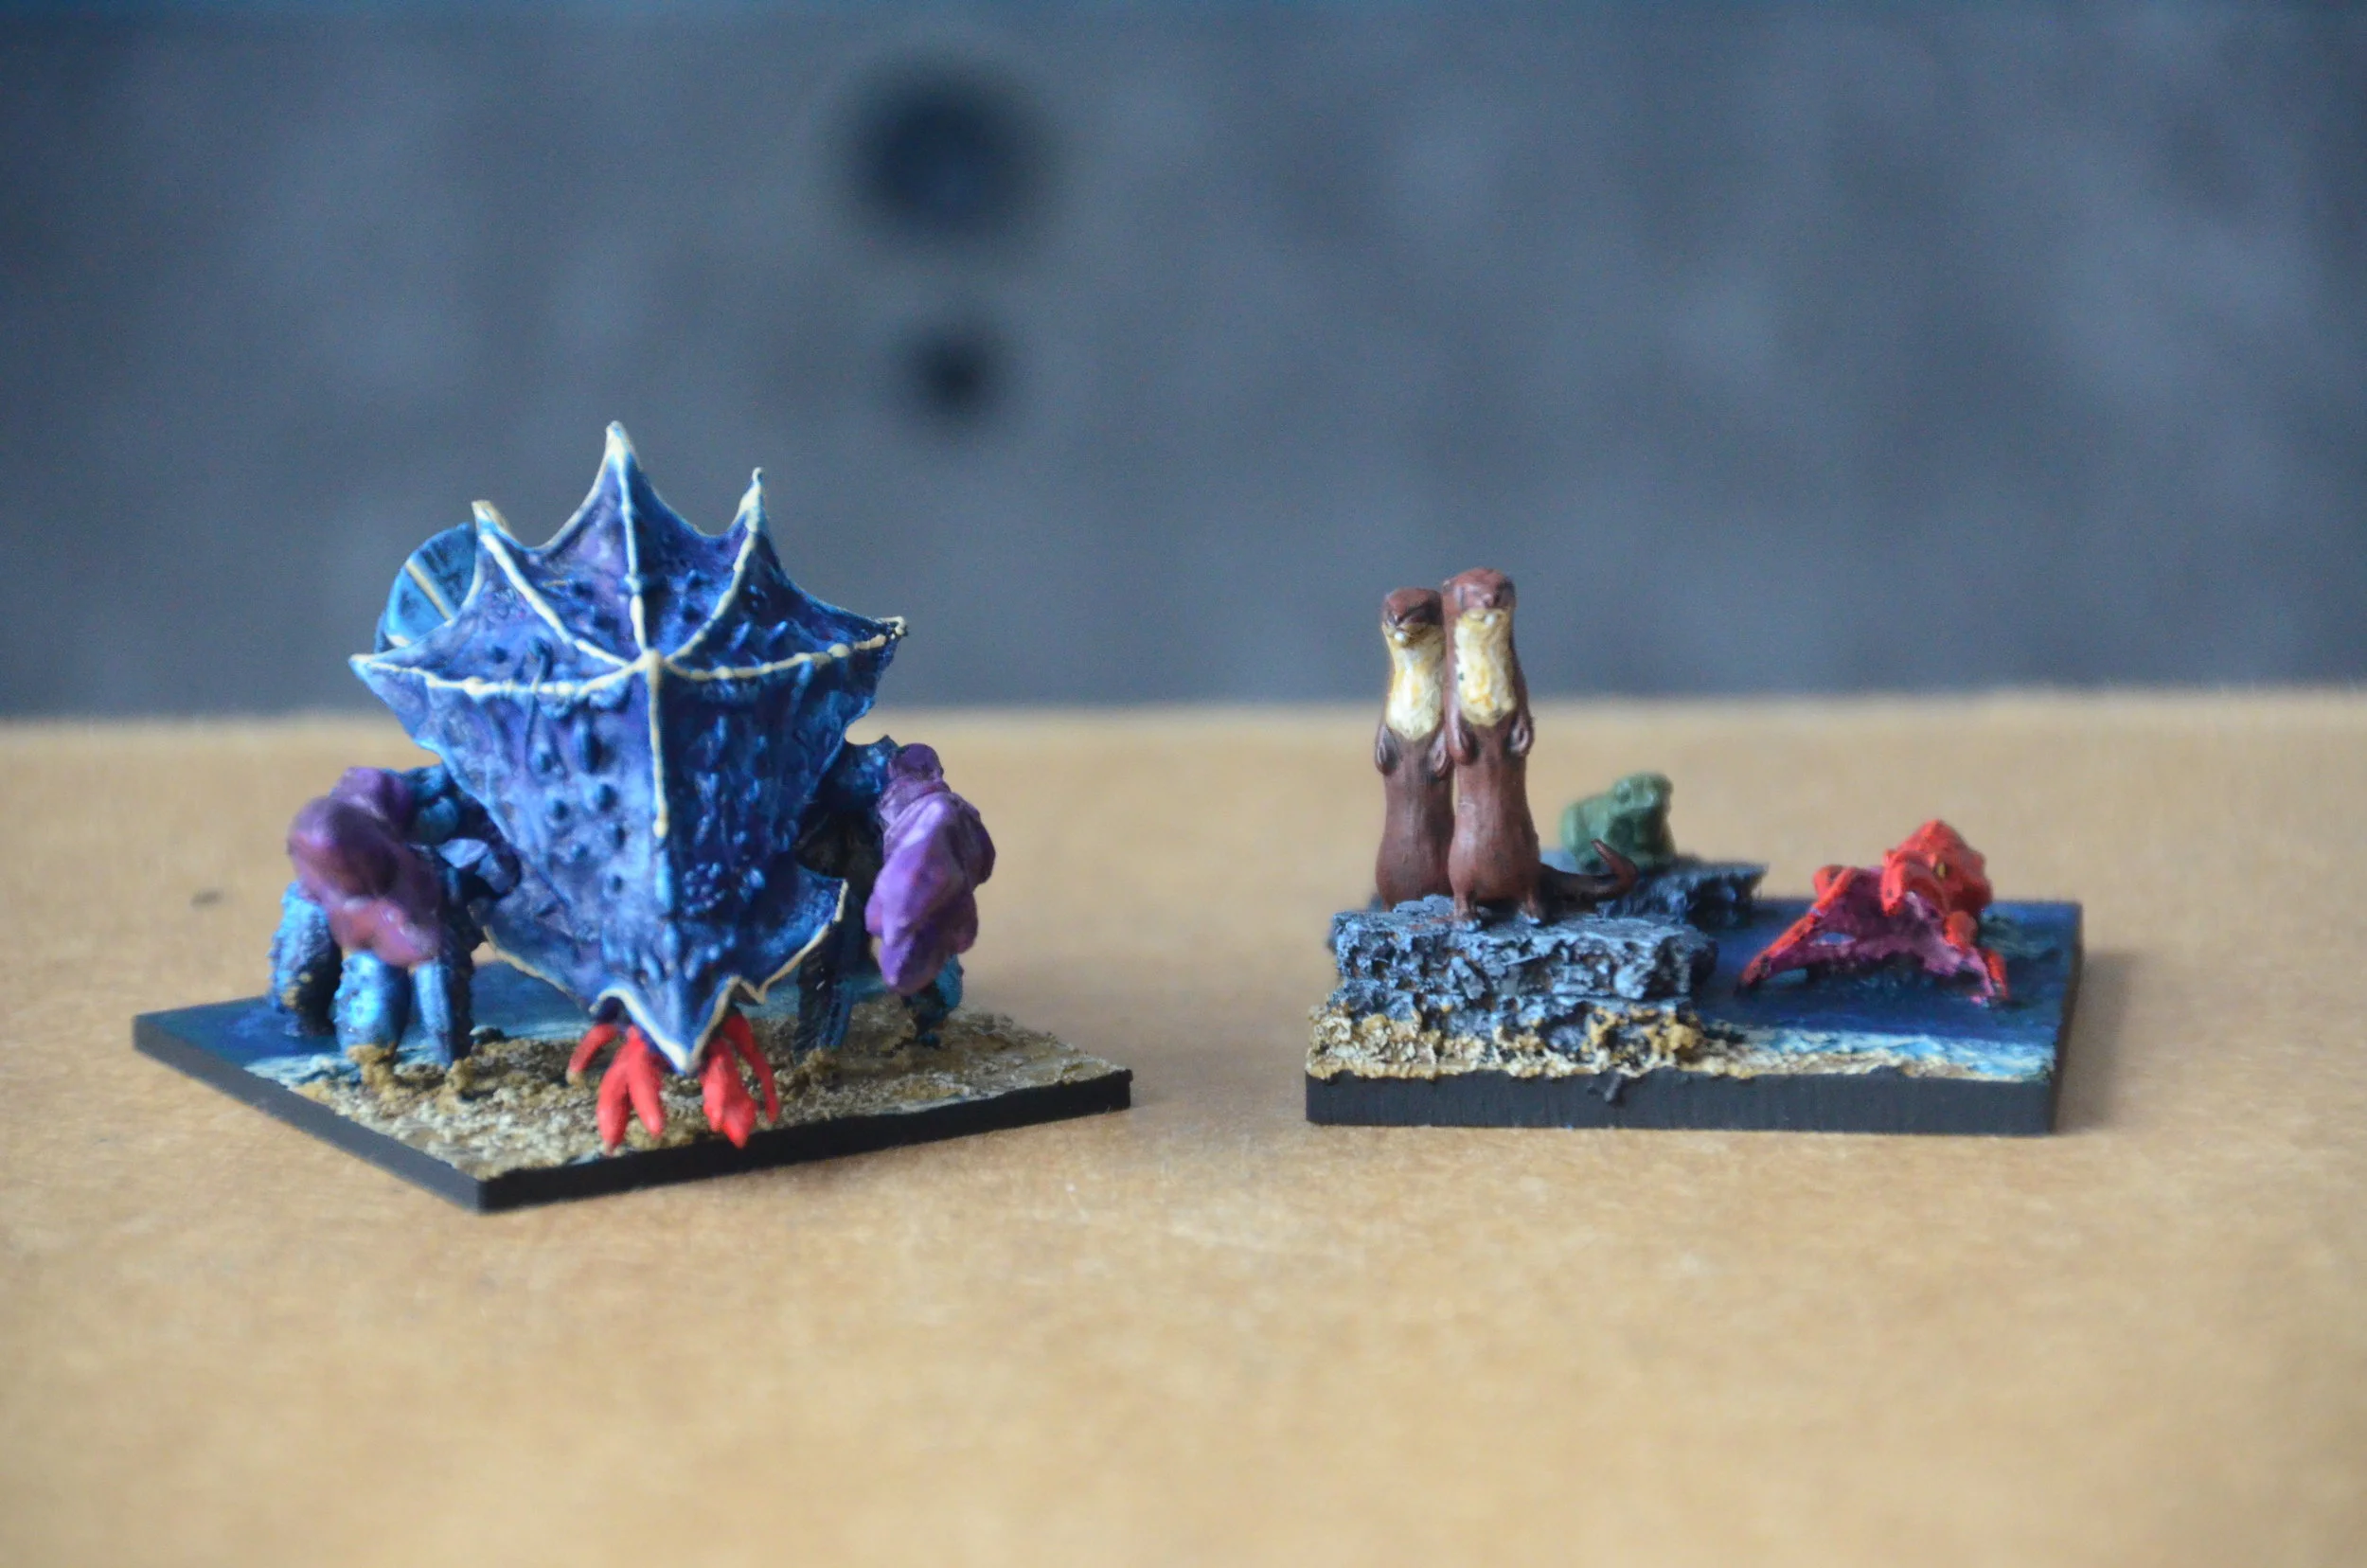
I decided to try something new (for me). The Abyssals are meant to be beings from another reality that have pushed through into the world of Mantica.
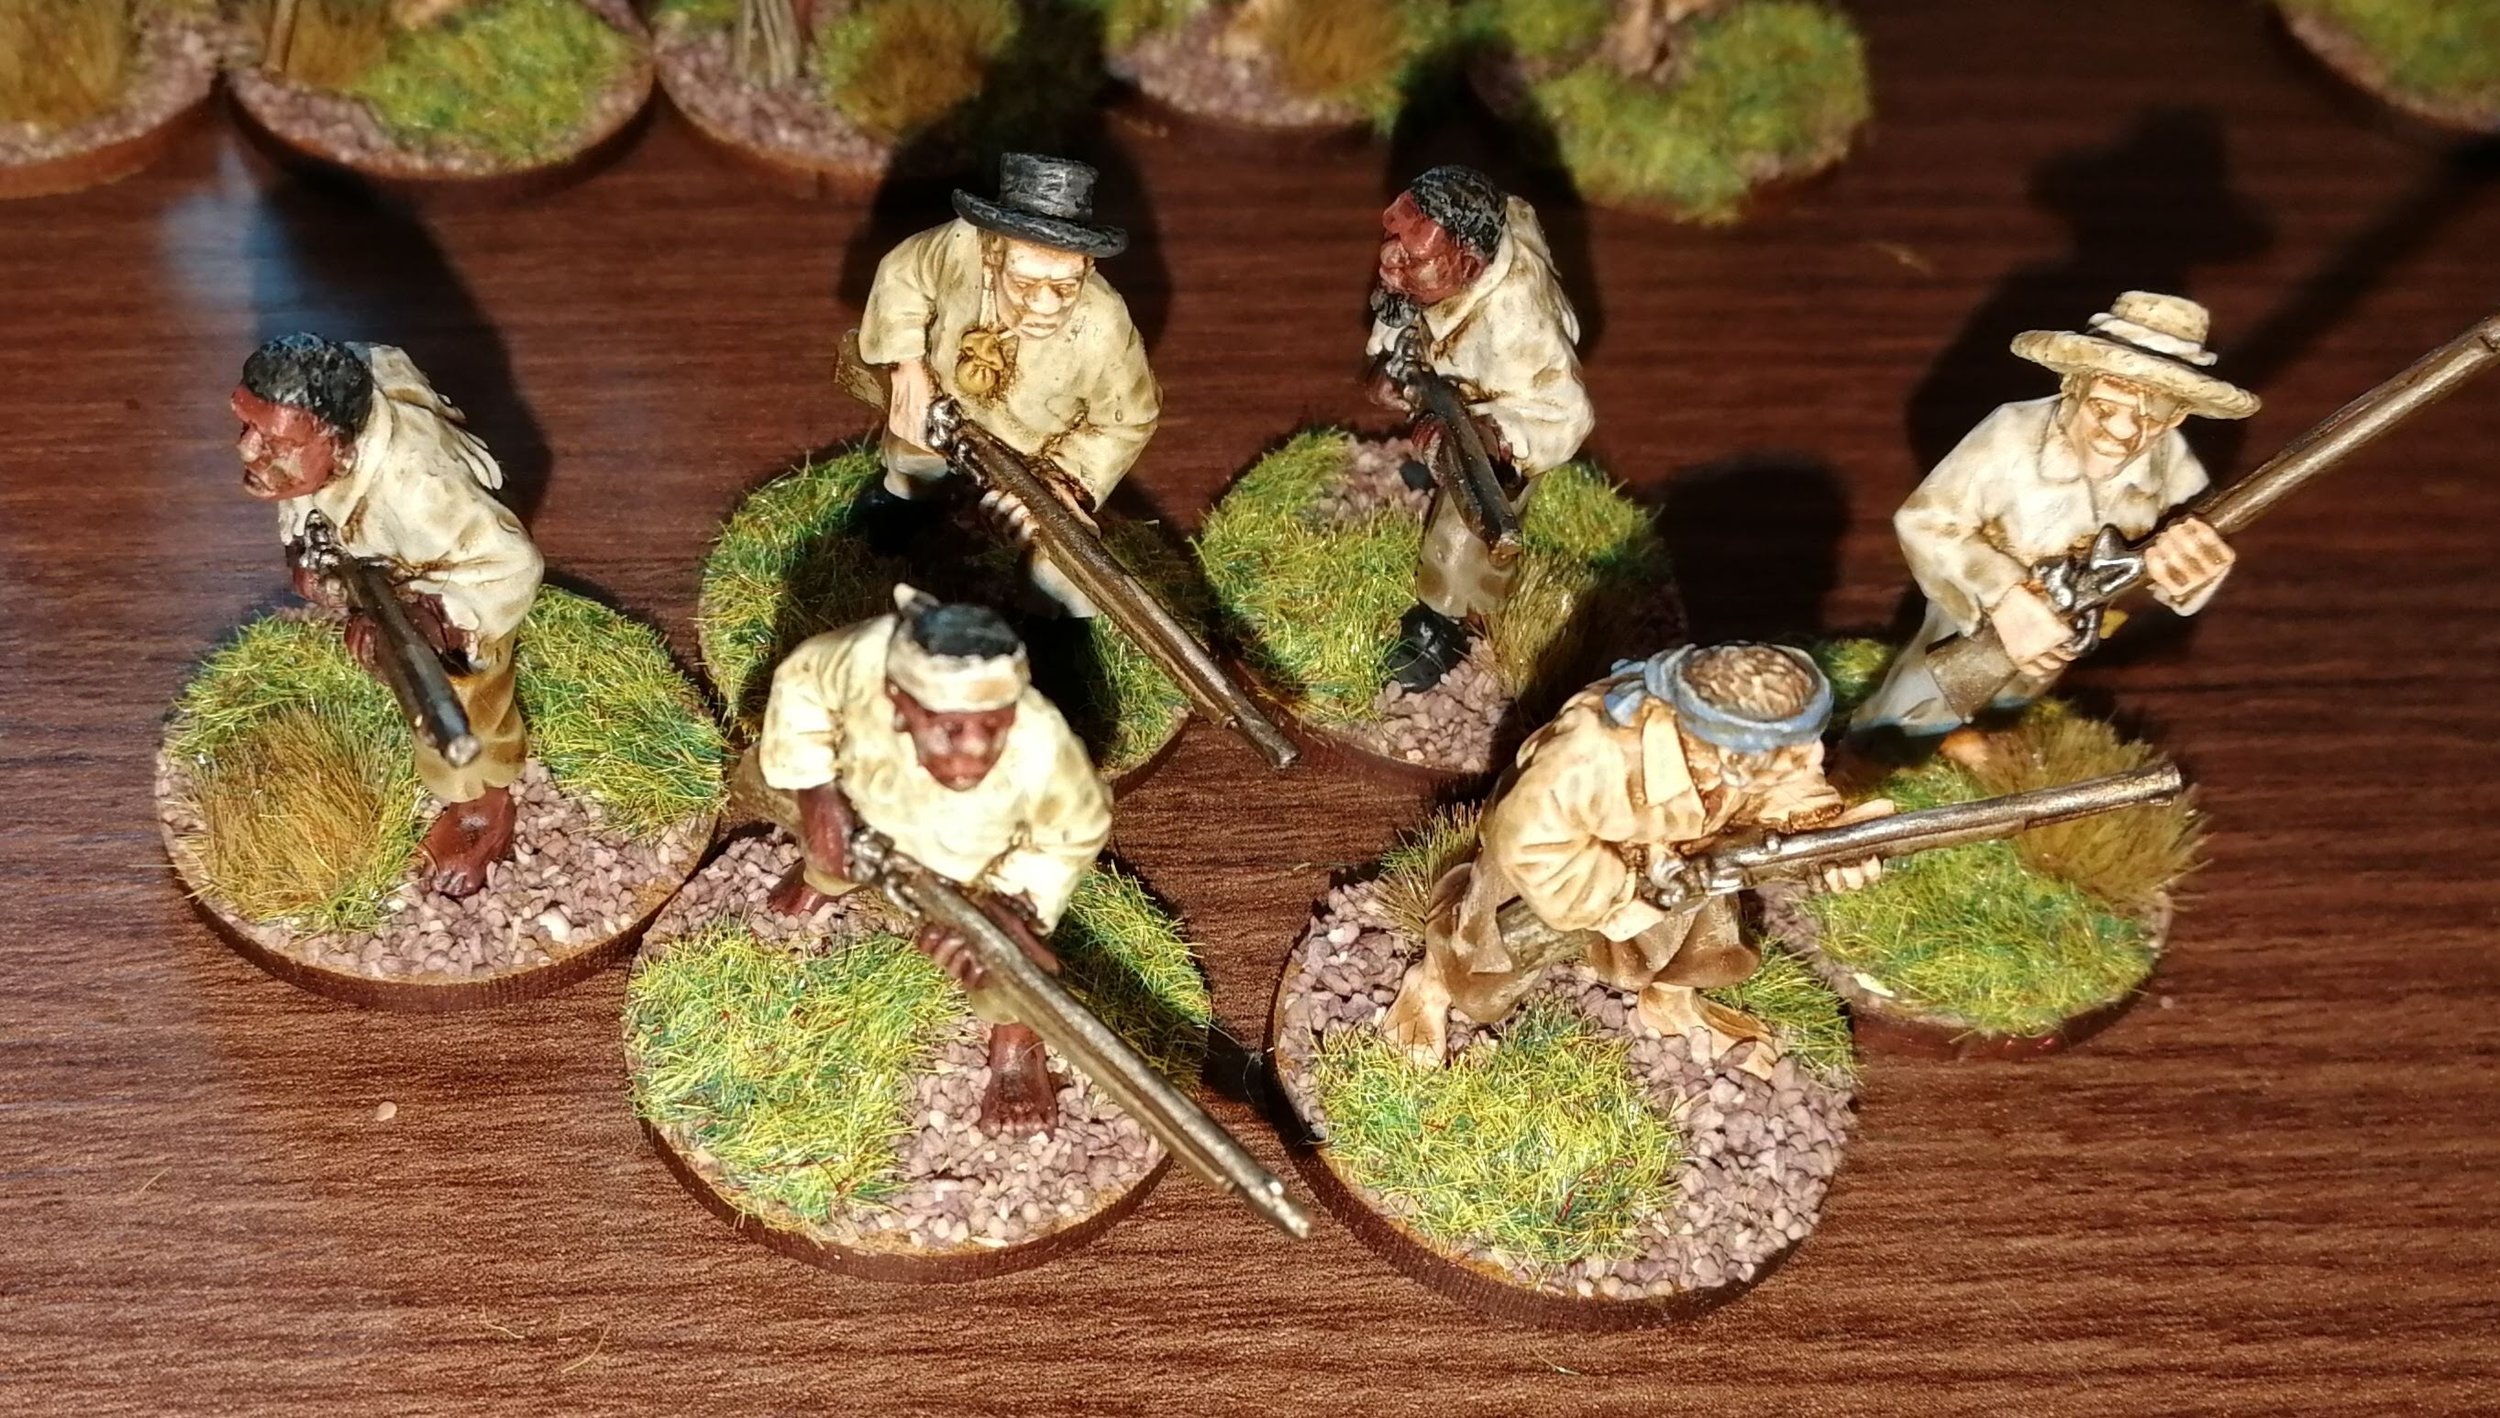
So to continue this other worldly feel I decided to have their skin tone transition from one colour to another, for their weapons to be made from a magical jade and their teeth to be blue.

Photo 1 - Chistopher Patchett.jpg

There had been a lot of talk about the new contrast paints so I thought I’d give them a go. All the pictures I’d seen had shown that flesh, cloth and soft items worked well but metal and hard edged armour looked a bit naff. So I decided to try a few of the reds on the skin.
I’ve used a combination of two red tones and a flesh tone to try and get the transitions.
All the other areas: weapons, cloth and armour I painted in a more traditional manner of base layer, wash and highlight.
The miniatures took the paint well and overall I think they came out ok. I’m not that great at blending but I think the effect worked.
Word of warning to the wise, the resin minis have some sort of coating; if you don’t clean the mini and cover every inch of the model with the undercoat then the contrast paints don’t adhere to it. I had a few small areas where I slapped the paint on and then it pooled away from the mini.
The fortnight flew by and as the time passed I saw Olly, Mark and Steve all finish painting their warbands. It was great to see the warbands come to life but really reinforced how slow I am at painting.
After a hard fortnights slog (I don’t normally get much time to paint during the week) I managed to get 5 of the models finished. Only 13 more to go.

Photo 2 - Chistopher Patchett.jpg

We agreed that our first game would be 100 points so I was pretty confident I could finish another model and make that limit in time. Hopefully…
Week 4: Our first games.
There was lots of chatter on our messenger group about the coming club night. We would have a good turn out and at 100 points we all managed to get a fully painted warband each. I’d spent the week reading the Vanguard rule book. It seemed pretty a pretty straightforward warband sized game with bespoke power dice and a lot of modifiers for combat. Like most people of my age time is getting harder and harder to find to learn, paint and play the mass battle games of my youth so I thought if it’s half way decent it should be fun.

Northern Alliance v The Forces of the Abyss

My first game was against Rob with his northern alliance and we decided to just run at each other and see how moving and combat worked.
Rob went for quite a wide spread to his warband I assume in an attempt to get round my flanks. I opted for a more snug deployment as these games usually rely on you applying force en masse.
Rob had chosen a commander but I couldn’t afford one as I’d chosen a large monster (the Despoiler). Even in the first turn I noticed the lack of power dice. Rob was able to run and move while I lumbered forward.
I was already thinking this wasn’t going to go well.
When our warbands hit in the middle we learnt the difference between grunts and warriors. A grunt who reaches zero wounds dies immediately, a warrior however is just knocked down and has to take a modified nerve test.
The grunts disappeared quickly banished back to their realm or died in gouts of blood while the warriors fell over to get back up in their turn.
I also learnt that ganging up on someone really helps! Additional dice and modifiers stack really quickly in this game turning even puny grunts into killing machines with three friends for help.
I had set the Despoiler up to the right of my battle line with the hope he could stop Robs guys flanking me. Shortly after battle was joined the Despoiler hit one of Rob’s dwarves and turned him into mush. He then used his follow up move to swing round and face the warrior moving in on him.
On the opposite flank Rob’s boss moved in to attack my Succubus Lurker. In a one on one fight she stood no chance and was slapped down, to bravely pass her nerve test and lie there groaning.

Photo 3 - Chistopher Patchett.jpg

Here we made our one major error of the game. If your warrior is down and attacked again they can defend but they don’t get to take another nerve role. We missed this passage and so the Lurker managed to lie there for 3 more rounds as Rob’s boss with mounting frustration kept kicking her and she kept passing her nerve test.
In the middle of the field our warriors faced off and rob threw an amazing four eights from a warrior to flatten my Abyssal guard. It all seemed pretty evenly matched as we slugged it out.

Photo 4 - Chistopher Patchett.jpg

Back to the Despoiler who now proceeded to take on all comers and munch his way through the rest of the northern alliance.

Photo 5 - Chistopher Patchett.jpg

Two turns later and the Despoiler had lived up to his name and finished off the entire warband save Rob’s commander. Meanwhile I had only lost two figures. At that point we decided to call it having gained a much better understanding of the actions and ready for a real challenge.

Nightstalkers v The Forces of the Abyss

Second game of the night was against Mark’s Nightstalkers. I’d glanced over a few times and had seen him systematically destroying Dave’s Basileans so I wasn’t hopeful.
We had a proper mission this time. We had three stones set up on the board and the mission was to hold them each turn. I repeated that to myself over and over as I set up.
Turn one started and Mark floated forward. I was down on power dice again so decided to start with my grunts holding back the real power of the force as long as possible.

Photo 6 - Chistopher Patchett.jpg

After about half our forces had moved I noticed Mark was being quite conservative in his movement not running and just walking.
I later found out why; it was because his floating brain had a horrific ranged attack and his other guys more like rockets. So he must have been hoping I would over extend some guys that he could pick off before I could charge him. So I obliged and shot my guys up the board at top speed.
Turn one ended and one grunt was dead to his brain and a second was in real trouble. But I was holding two stones which gave me a massive advantage going into turn two.
I was up on VPs but my force had taken a real battering for that advantage and I knew it was going to get worse as we entered turn two.
Turn two started and Mark was now itching for a fight. He’d seen my charge for the stones and knew he needed to take them back asap.
I moved up to consolidate my position with the Despoiler and the rest of my forces. I saw another lower abyssal go down. My warriors were also being knocked down left and right.
During this turn the moment came to use my tiny amount of power dice. Mark had charged his Shadowhound into my flamebearer and knocked it down. I could see I had one chance left to swing this fight.
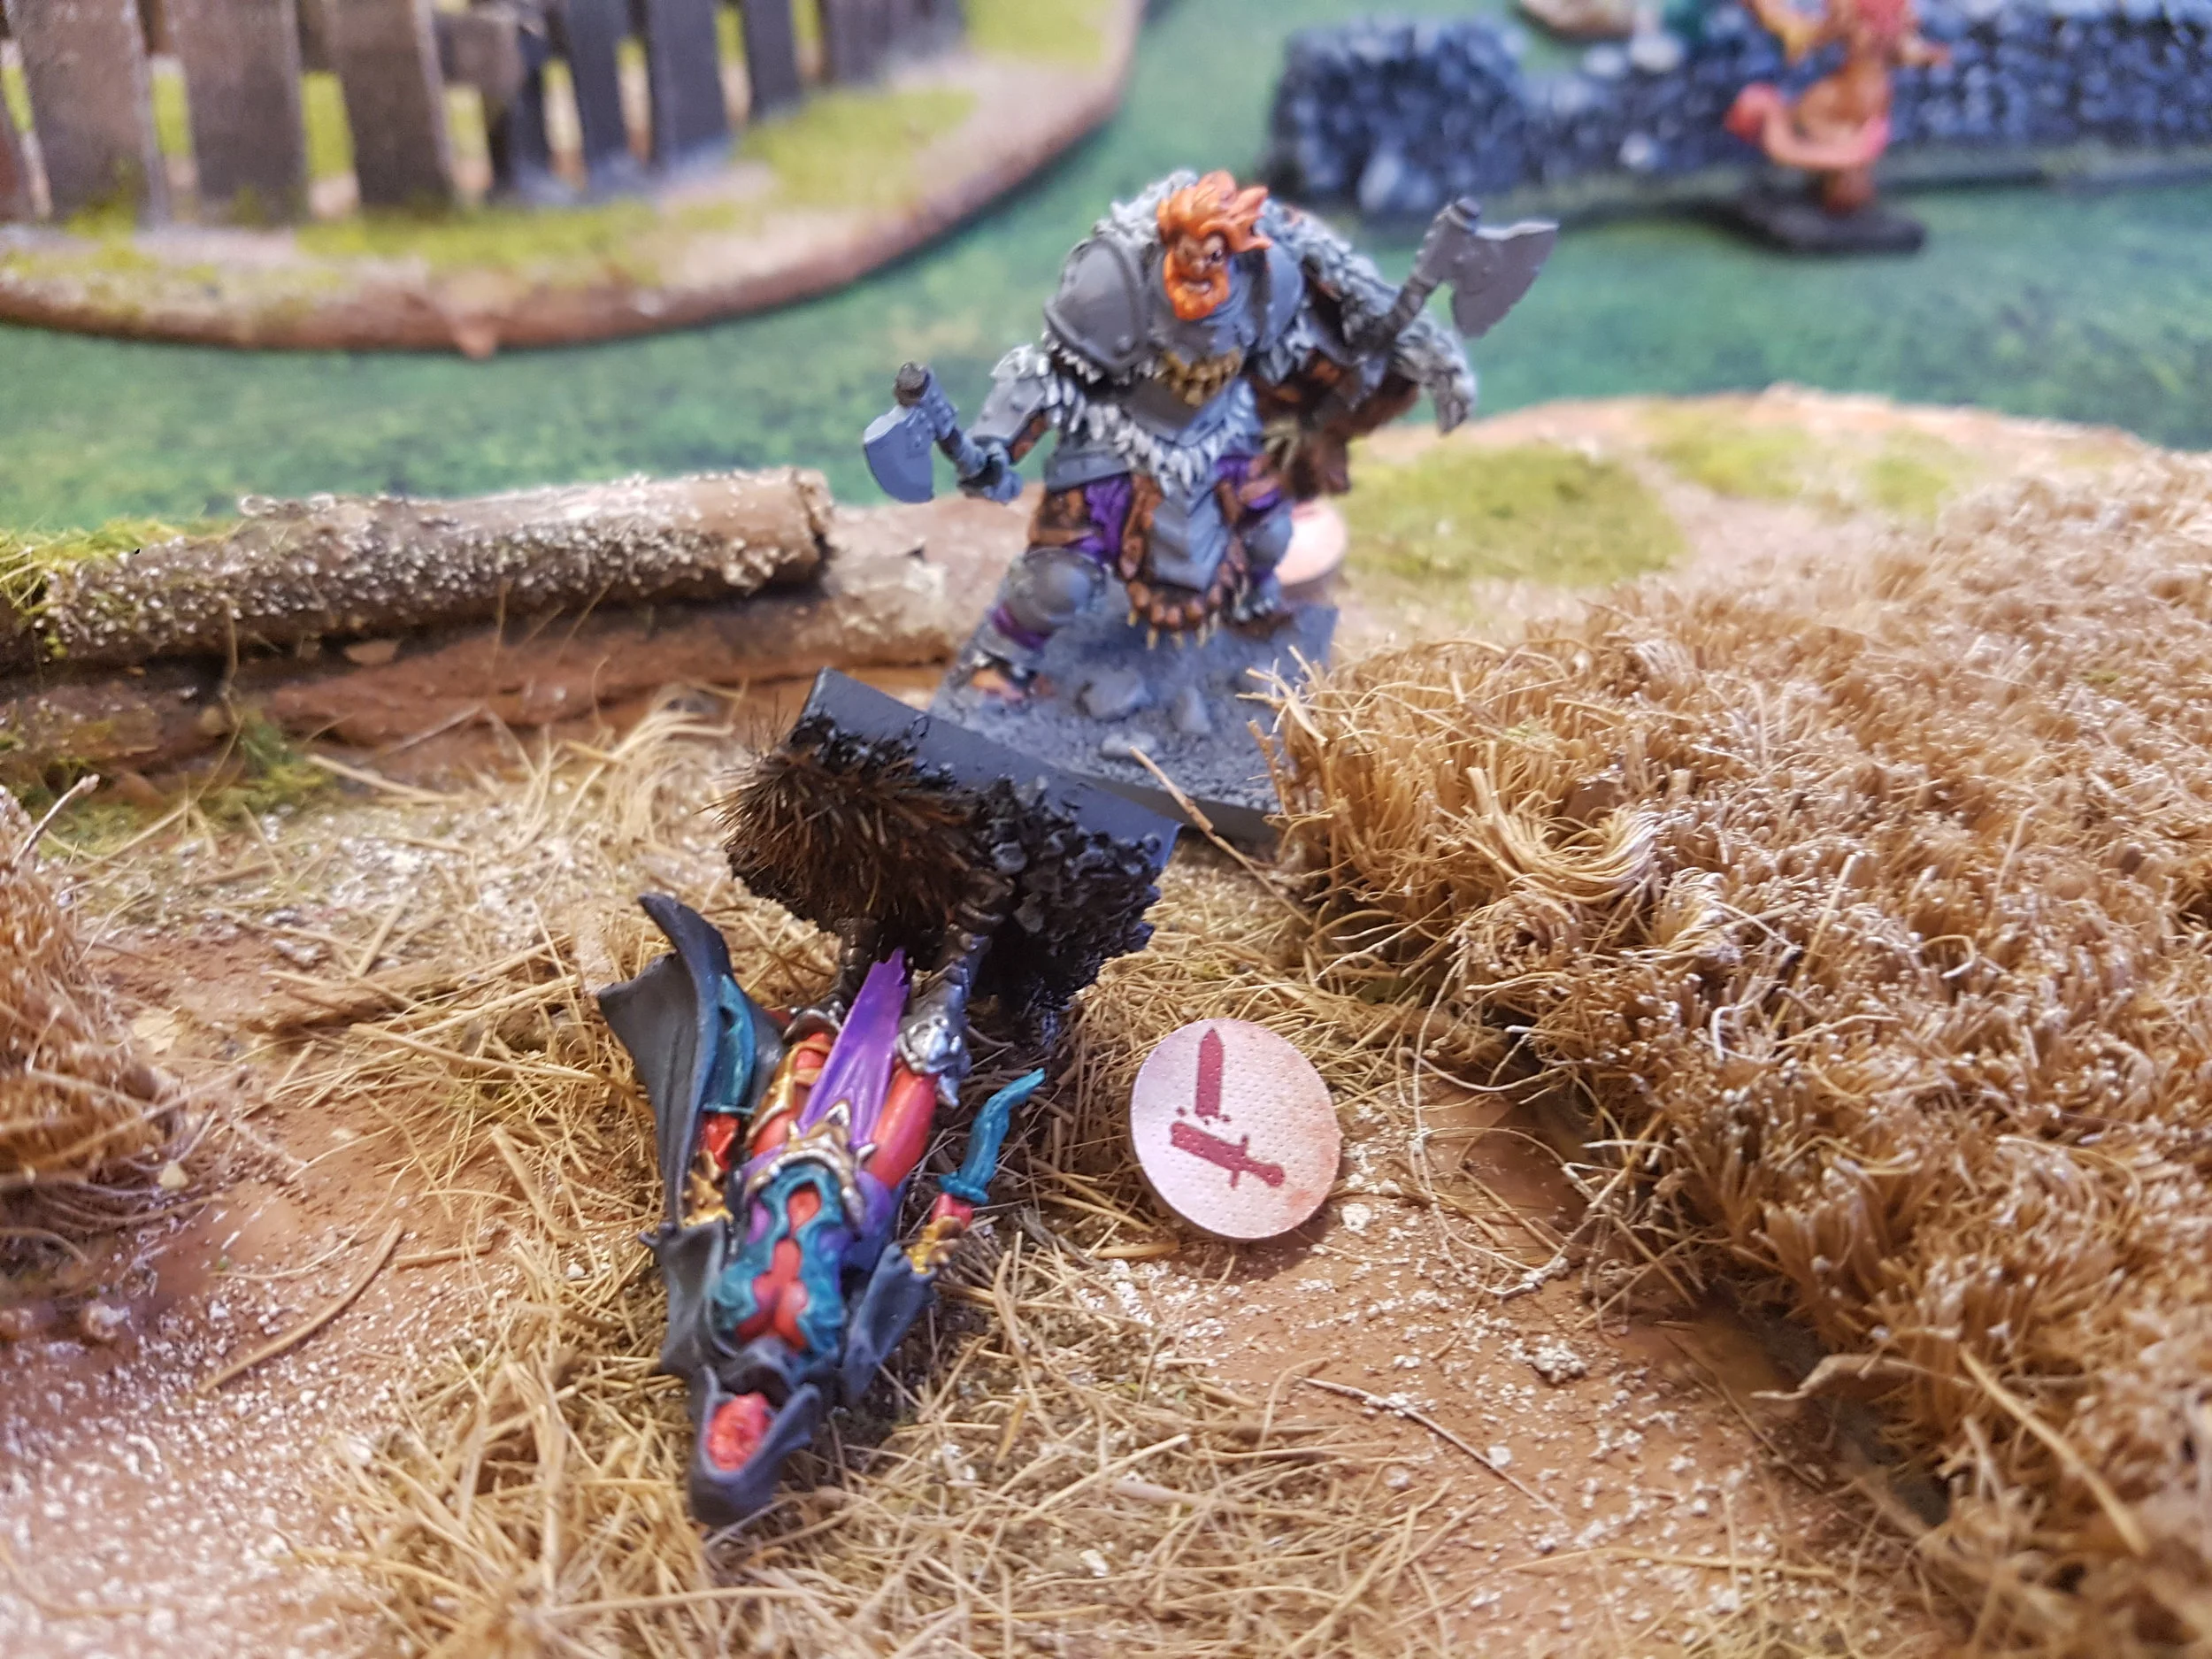
So my Succubus Lurker charged across the battlefield and struck. Se charged the hound in the rear which meant she had extra dice, could reroll 1s and had exploding 7s and 8s but just to make sure I used a power dice to throw an extra dice too.
The hound exploded in a flurry of 7 hits. It failed its nerve and went down. But I wasn’t finished there I also used a power dice to activate another model. The despoiler who hit one of his scarecrows squarely in the face. I chucked in my last power dice to again give it an extra dice. I was taking no chances. Again one dead monster.
I didn’t survive unscathed as the Mind-screech killed the Succubus and the rest of my gang fell. But I’d pulled it back to a respectable 2 models a side. One of those was the Despoiler so I was quite happy if I could pass the nerve test I could probably still win this.
Thankfully in the end phase the Mind-Screech thought better of facing off against the hulking mass of the Despoiler and scarpered.
We ended the night 4-0 win to the Abyssals.

Post-game round up

I hadn’t started the night with high expectations. The rules sounded ok but I was missing the hook from reading the book cold and not playing. After two games I’m hooked. The rules are pretty simple but there is a lot there when you get playing.
The power dice was massive to both games I played. Having no commander I was always on the back foot to my opponent’s power moves. The one turn I got a decent number of power dice I ruined the Night Stalkers. I will definitely be adding a commander next game.
Ganging up is also super important. Even lowly grunts could bring down a Despoiler if there’s enough of them! Combine that with the power dice and I can charge 3 guys at once. The first might not hurt the Despoiler but the 3rd will be rolling additional dice from the support.
Two great games – can’t wait for the next club night.

BRITCON 2019

Club Member Lawrence writes about his time at Britcon & tells of his luck at the DBMM tournament!

Britcon is the main British Historical Games Society event of the year and includes tournaments in numerous rule sets, trade stands and a bring and buy. More details can be found at http://www.bhgs.org.uk/britcon.html

This is a report on how my games went in the DBMM tournament. The tournament covered the whole period from 3000 BC to 1515 AD, so this is the one chance in the year to find out which was “the best army of all time” (at least, all pre-renaissance time). Armies were 400 points and the scale was 15 mm.

My army was Patrician Roman (Western, in Gaul, 452 AD), slightly adapted from one I had used at Roll Call earlier this year. The order of battle was:

  • CinC Aetius, brilliant general - regular light horse (superior)

    • 4 Auxilia Palatina – regular auxilia (superior)

    • 5 Foederati foot - regular auxilia (superior)

    • 1 Equites Illyricani - regular light horse (ordinary)

    • 6 Alan mercenaries - irregular light horse (superior)

  • Subgeneral - regular cavalry (ordinary)

    • 5 Equites - regular cavalry ordinary)

    • 5 Gothic and Alan lancers - regular knights (fast)

    • 1 Equites Illyricani - regular light horse (ordinary)

  • Subgeneral - regular light horse (superior)

    • 4 Legionarii - regular blades (ordinary)

    • 2 Garrison legionarii - regular blades (inferior)

    • 3 Archers supporting legionarii - regular psiloi (ordinary)

    • 6 Auxilia Palatina - regular auxilia (superior)

    • 5 Archers supporting auxilia - regular psiloi (ordinary)

  • Army baggage

    • 6 Pack mules - regular baggage (fast)

  • Stratagems

    • Feigned Flight, Invader’s concealed command

    Note : Left and Right below refer to directions from my point of view.

Quick DBMM terminology guide:
In DBMM (as in DBA) the basic “unit” is an “element” or “base” i.e. 2-4 figures fixed on a base, representing roughly 100-200 men in real life. So when I say “6 Alan Mercenaries” above it means 6 elements, i.e. maybe 600 horse archers in real life. It doesn't have multi-base units like most games, but elements are grouped together into 3 or 4 “commands” for command and control and morale purposes. Commands don't have to move together and can be split up, but become harder to control. Generals command each command and roll a dice each turn to see how many “PIPs” they get, which they spend on moving their troops (or preventing them from advancing if they are impetuous or from routing if they are broken). Troop types are mostly obvious, but for the avoidance of doubt “blades” = all heavy foot other than spear and pikemen, “psiloi” = foot skirmishers and “auxilia” = loose order foot with javelins and usually a sidearm and shield, possibly also armour.
Quality levels are inferior, ordinary, superior and fast (which means looser formation and less armour than normal for that troop type, but faster movement). Below I have mostly used historical troop type names which you can easily find on google if you don't recognise them.
Games are scored out of 25 points which are split between the players depending on how much damage they did to each other.


Game 1 : Keith Nathan, Navarrese, 1350 AD

Potentially a tough match-up as he would have Norman superior knights, free company superior blades and superior longbowmen, and more superior auxilia (the Navarrese themselves) than me. On the other hand, my command and control would be better.

I invaded a battlefield with a lot of rough going features, mostly around the edge, but with one patch of rocky ground in the middle that would give my infantry some protection from the Normans. Deployment resulted in my knights and cavalry facing Navarrese auxilia on the left, my legions and auxilia behind the rocky ground, facing the Normans, some psiloi facing a free company ally command consisting of Gascons and English to the right of the rocks, and more Navarrese on a scrubby hill facing another scrubby hill on my rear right that Aetius reserve auxilia were poised to occupy. Aetius' light horse were behind the mounted command.

BC19-g1-1 - Lawrence Greaves.jpg

In the early phase of the game, Keith moved his Normans to face my mounted and his left wing auxilia to the right, then made a U-turn to bring them back to face my cavalry that was attempting to outflank the Normans. This meant the Navarrese general was now at the front of the column instead of the rear. The free company was unreliable – “Free” does not mean you don't have to pay them. Some crossbowmen that were with the Normans came forward to shoot at my legionaries. On the right, the Navarrese infantry came off their hill to threaten my flank, so I moved my auxilia reserve to the right to oppose them, but they were too far back to have any influence at this stage. I moved my infantry command to the right as well and the light horse reserve came forward.

BC19-g1-2 - Lawrence Greaves.jpg

My cavalry on the left advanced to threaten the Navarrese auxilia. They were now close enough that one of the Norman knight units could charge them, which it duly did, supported by one of the auxilia. The knight killed his opponent, but the auxilia died. This left the Navarrese general vulnerable to a front and flank attack from my cavalry and, of course, he died. However, I didn't have enough PIPs (command and control points) to deal with the loose Norman knight unit, which went on to wipe out several more bases from my mounted command before I was finally able to surround and eliminate it.

While that was happening, my Alans charged the rest of the Normans and did a feigned flight. Two of the knights pursued impetuously and were eliminated by the returning Alans. My cavalry managed to break the leaderless Navarrese auxilia and seeing this caused the Normans to break too.

By that time a chaotic melee had developed between the other Navarrese command and my troops on the right, with casualties on both sides. However, the intervention of the now victorious Alans coming across from the left turned this fight in my favour, giving me an overall win for a score of 23-2.

BC19-g1-3 - Lawrence Greaves.jpg

Game 2: Ian Austin, Hittite Empire, 1336 BC

I had met Ian with more or less the same army at last year's Britcon and he had fought mine at Roll Call, so with both had a reasonable idea of what to expect. He had three substantial commands of light chariots (mostly superior with some ordinary) backed up by poor quality light foot and a fourth command of fast pikemen with a chariot general. He invaded and the battlefield was split by a vineyard, some rocky flat ground and a scrubby hill running in a line from my rear right corner to the centre of the table, and a built up area (BUA) also halfway across the table, but about 600 paces to the left of the hill. I deployed the foot command behind the hill, the CinC behind the BUA and the mounted in between. Ian deployed behind the hill and the rocky ground with two commands up, two back and the baggage in the middle of the army. This meant Aetius' auxilia were miles away from where they would need to be.

BC19-g2-1 - Lawrence Greaves.jpg

The weather was overcast with mud for the first three turns and a risk of rain that would lead to more mud, which would disadvantage his chariots and my knights. However, my poor PIP dice on turn 1 removed any risk of rain, so the actual fighting would take place in good conditions.

I advanced all my mounted through the gap and the Ian brought out chariots from all his commands to fight them. The remainder of the Hittite CinC's chariots faced off my infantry that had by now advanced over and off the hill to support my mounted. The Hittite pikemen wheeled to attack the end of the hill, I tried to hold them off with psiloi, which were in turn countered by Hittite auxilia. Meanwhile, Aetius' auxilia were marching across the rear of my army as fast as they could. The mounted forces engaged.

BC19-g2-2 - Lawrence Greaves.jpg

The left hand end of the Hittite line was mobbed by the Alans, who killed off one of the generals. His command soon broke, but the chariots in reserve counter-attacked and broke my mounted command, but the general was able to prevent them from running away. The Hittite CinC's chariots attacked my foot command but didn't do much damage. The end legionary element was hit in front and flank but threw off the attackers, which enabled the Alans to hit one of them in the rear and eliminate it. Meanwhile Aetius' auxilia arrived and engaged the end of the pike block, doing significant damage. Time ran out with losses standing at 36% of my army and 35% of Ian's, but he also had one command disheartened, giving me a 13-12 score.

BC19-g2-3 - Lawrence Greaves.jpg

Game 3: Thom Richardson, 100 Years War English, 1340 AD

Another tough-looking matchup with mutually supporting superior longbowmen and knights dismounting as superior blades, this time with good command and control. I forgot to take any pictures of this one until half way through. I defended and deployed opposite where I thought Thom's army would be, i.e. between Thom's nice-looking marsh on the right side table edge and a built up area and wood in the middle of his half of the table. The auxilia of the foot command were ready to enter the marsh and Aetius' auxilia to enter the BUA. The mounted command and the legionaries were between the two. Thom occupied the BUA with javelinmen (superior psiloi), filled two thirds of the gap with bow/blade commands and next to the marsh deployed a German ally with ordinary knights and some skirmishing crossbowmen behind the marsh. There as also an element of artillery on the road near the wood. At the back was a small command of superior bow and some Welsh spearmen at the back ready to block the space between the wood and the table edge. Weather was muddy again, but again conditions cleared up before we got to combat.

After several moves my auxilia had taken most of the BUA, and the Alans had tried to go around it but been engaged by some longbowmen in the gap between it and the wood. Dismounted knights had advanced beside the BUA and were starting to chop up the foederati. The rest of the longbowmen had advanced towards my mounted command, which had retired out of shooting range and detached a knight to the left and the light horse to the right. The German knights were starting to advance past the marsh with their flank guarded by more English dismounted knights and the German psiloi were trying to keep out of the way of the Roman auxilia and psiloi that had advanced through the marsh.

BC19-g3-1 - Lawrence Greaves.jpg

The disjointed fighting around the BUA continued with losses on both sides, though it has to be said rather fewer on my side than one might have expected. The longbowmen in the centre split up enough that I thought it worth preparing for a mounted charge on them, but the focus of activity was on the German knights' attack on the legions. I had left a couple of light foot out on the wing to threaten the flank of the knights as they came past. Thom detached two knight elements to deal with this threat and charged the legionaries with the others. The first charge was resisted. The second one wiped out the garrison legionaries who were hit in both front and flank, but the palatine legions recoiled their opponents and counter attacked, resulting in the German general being stuck in combat and unable to command properly in his turn. Meanwhile I brought an element of psiloi out of the marsh to harass the detached knights. This psiloi was ignored, the Germans charged the legions again and again they were recoiled. At this point we realised that the lowly psiloi that Thom had deemed unworthy of attention was now within reach of the rear of the German general. A combined front and rear attack knocked him out and the shock of the English CinC's command finally breaking took the army over 50% losses. I had lost just under 10%, so 25 - 0 to me.

BC19-g3-2 - Lawrence Greaves.jpg

Game 4: Greg Mann, Nikephorian Byzantine, 990 AD

This army is small, but full of tough troops with superb command and control and almost unbreakable morale. I invaded. Greg had a large gentle hill in the centre of his deployment area, which I expected him to deploy on, but instead he deployed to the right of a vineyard that was slightly right of the centre of the table. This resulted in my deployment plan being less than optimal. Facing my cavalry and knights was a command of artillery and skoutatoi with a couple of psiloi. Their flank near the vineyard was protected by a small skoutatoi command in column. In reserve were some cataphract wedges and light horse and opposite my foot command on the right were the kavallarioi (superior cavalry) with a couple more light horse and some Rus auxiliaries. On his first turn, Greg advanced within artillery range and moved his cavalry command out to face and possibly outflank my auxilia.

BC19-g4-1 - Lawrence Greaves.jpg

My mounted would be shot to bits if they stayed where they were, so I attacked with them, although even that was risky. The legions moved up to support them. Aetius' auxilia advanced into the vineyard and the question was whether to send the Alans around the vineyard to (eventually) threaten the Byzantine rear, or across to fight the kavallarioi and prevent them threatening my rear. I picked the latter.

My mounted command got shot up on the way in, but overran the artillery and the supporting legions killed some skoutatoi. The cataphracts counter-attacked with some success. The Alans destroyed one of the kavallarioi elements and then feigned flight, but Aetius' auxilia had to feign flight too because they were in combat and in the same command. The result of this was Greg's entire army apart from 2 elements was made impetuous.

BC19-g4-2 - Lawrence Greaves.jpg

With 4 regular generals, Greg was able to prevent nearly all of his troops from making spontaneous advances. The flight of the auxilia had opened up the flank of my cavalry general to a bow shot from some skoutatoi. There was only a 1 in 18 chance of killing him, but, of course, it happened. This precipitated the rout of my mounted command next turn, although (with the aid of flank attacks by the legions) they did manage to destroy both the cataphract wedges before running away.

This left me with a huge hole in the middle of my army and Greg with two disheartened commands, which if I could kill one more element off would trigger the defeat of his army through the “spreading panic” effect. Try as I might, I just could not get the kill I needed and was continually losing casualties to the kavallarioi. Finally I threw my CinC in against one of the enemy generals which gave me a 1 in 6 chance of winning the game and a 1 in 18 chance of losing it. I lost. Score 6-19.

BC19-g4-3 - Lawrence Greaves.jpg

Game 5: Paul Mace, Graeco-Bactrian, 152 BC

I hadn't played Paul before, but I knew he had won some games up to this point so was fairly wary. He invaded and we both placed a lot of terrain, although the only pieces that mattered were a rocky flat in the middle of the table, a BU to the right of this and a marsh quite a long way to the left of it and in Paul's half of the table. I spread my army out as I wasn't sure where he would deploy, but the rocky area was clearly going to be key, so I put the legionaries opposite that. He deployed to the left of the rocky area with a pike phalanx next to it with psiloi behind and cataphracts to the left of them. Also in the cataphract command were some thuroeophoroi in a small vineyard and some Indian hillmen in the marsh. In reserve was the large CinC's command with cavalry, light horse, xystophoroi wedges and more thureophoroi and psiloi ready to move into the rocks.

BC19-g5-1 - Lawrence Greaves.jpg

I moved my mounted command across to face the cataphracts, the legions into the rocks and the Alans leftwards with a view to supporting the mounted battle in the long run. Aetius' auxilia started the long journey to the marsh and the subgeneral's auxilia started making their way towards the rocks. Luckily Paul did not use his mounted reserve to interfere with this, preferring to reinforce the cataphracts. He moved all his thureophoroi towards or into the rocks and the phalanx advanced, echeloning back to avoid being outflanked.

My cavalry charged the cataphracts and Paul's combat dice were five 1s in a row, resulting in four dead cataphract elements. The survivors were still dangerous, though, and reserves were arriving, so I did a feigned flight to escape any counter-attack.

BC19-g5-2 - Lawrence Greaves.jpg

The Greeks held their positions. My cavalry turned around to re-enter the fray and the legions attacked the corner of the phalanx and the thureophoroi in the rocks. The cavalry fight didn't go too well for me and the cataphracts, reinforced by some xystophoroi, killed everything they touched until the legionaries attack on the thureophoroi broke that command. At that point I did another feigned flight to keep my now disheartened cavalry out of range of the xystophoroi. The presence of Aetius' auxilia on the flank deterred pursuit.

I now fed in the remnants of the mounted command against the phalanx and supported them with the Alans. This was a bit of a risk, but if it paid off I should win the game. It worked as one of Gothic lancers rode down their opponents and disheartened the phalanx. Now I just needed to kill a column of pikemen that had been drawn into the rocky ground and hit in the front and flank by legionaries. Three times I attacked and three times they stood their ground. Time ran out so I had to settle for a winning draw score of 15-10.

BC19-g5-3 - Lawrence Greaves.jpg

Game 6: Dave Pallin, Middle Imperial Roman, 309 AD

The paradoxical battle against the ancestors, although it has to be said that by the time of Aetius, there weren't that many actual Romans in the army. This was potentially a difficult match-up because Dave's army contained Praetorians that would beat any of my infantry with ease, legionaries that would beat most of my infantry with ease, cataphracts that would beat my Roman cavalry with, legionaries armed with heavy clubs that would beat my lancers with ease and auxilia that were the equal of my own in quality, if not quantity. However, I had superiority of numbers in mounted and difficult terrain troops.

Dave invaded and picked a wood and a difficult hill, which both fell either side of his deployment area. I didn't want to fight his auxilia uphill, so placed a built up area next to the hill. If he defended it he would have no uphill advantage. If not, then it gave a safe route for my auxilia to advance past the hill. As it turned out, he deployed some auxilia on the hill but later moved them into the town. More auxilia were deployed in the wood and the rest of the army was between the wood and the town, Praetorians on the right, normal legions on the left and mounted behind. There was a small gap between the town and the end of the legions, which he later blocked with some more auxilia.

BC19-g6-1 - Lawrence Greaves.jpg

I advanced and split the Alans, some to go left over the hill, others right where it looked as though I might need reinforcements. Dave also advanced and moved the auxilia from the hill into the town. I used my psiloi to delay the Praetorians and attacked the normal legionaries. Most of my foot command, however, withdrew as they didn't want to get into serious combat with the superior praetorians.

After a couple of turns of fighting, Dave's ordinary legionaries were broken up into sex separate groups which would be very difficult to control if I did a feigned flight, so that is what I did, at the same time switching the Alans from the right to the left where I anticipated them pouncing on impetuous enemy chasing my cavalry. Unfortunately Dave's PIP dice were good next turn, allowing to keep control of the entire command. Therefore I had to turn round and bash through the hard way. Eventually the enemy command broke, but Dave was able to halt them to prevent a rout and they resisted all my attempts to shift them. Even the two auxilia in the town held out despite being surrounded on three sides. Meanwhile, Dave's Praetorians advanced and his mounted reserves were brought into play.

BC19-g6-3 - Lawrence Greaves.jpg

While I was still fighting my way through the broken enemy that just wouldn't die and the town, the Praetorians and cataphracts were able to catch up with my foot command and break them. The sight of this also disheartened my mounted command. Time ran out at this point (forgot to take a final picture, but there were a lot less of my infantry at the bottom right). Final score 12-13.

I finished up with a total of 94 points, which was enough to get me second place in the tournament and a prize consisting of a pint glass and a pack of “Forged in Battle” Dacian light infantry.

Lawrence Greaves

MHWC Vanguard - Dave, Post 1

"Your Club, Your Story" Kings of War Vanguard Skirmish Project
The View from the Club

vanguard-logo - David Mustill.png

"Brother Ivadd? They are ready for you now."
Footsteps shuffled away along the corridor as Ivadd roused from his meditation. The novice must have knocked just as the sun peered above the horizon, streaming it's piercing light through the tower window. Refreshed, he rose from the prayer blanket angled toward the burning dawn and walked gracefully to the door. Passing his mace, sword and helmet on their ceremonial rack he touched a fingertip to each as he passed, a whispered blessing for each on his lips. While he was dressed in his armoured uniform, an audience with the Holy Confluence was not the place for the weapons of his Order.
Passing through the door from his chambers, Ivadd followed the receeding footsteps into the depths of the fortress...

vanguard-rulebook - David Mustill.png

And so begins our journey into the world of Mantic Games' Vanguard skirmish wargame system, based in their Kings of War universe. I have found Mantic to be a little up and down over the years; My first and only try of Kings of war was a total disaster (mainly due to facing off against a severely broken army list) which seriously put me off, but I am a big fan of their Walking Dead All Out War game. I have some Dwarfs in my army from their KoW range which are passable but not spectacular, but their Walking Dead minis are superb! So when Olly from the club announced that he had managed to get us involved in the Vanguard promotion I had mixed feelings, but the chance to represent the club on a national (and potentially international) level was too big a chance to pass up! I liked the look of several of the factions we were sent, but settled on the Basilean warband. Apparently this makes me the good guys! I have been painting some medieval men-at-arms lately and the basic troops are a stylised version of European spearmen, so it felt like a reasonable fit for me.

DSCN3912 - David Mustill.JPG

First impressions from everyone involved have been positive overall. The rulebook is a nice glossy hardback edition, with some great artwork and tons of gaming/miniatures photos. The rules seem pretty straightforward; more on those when we get to actually try them out! We also received some Power dice each (much better than the WD AOW ones, the only drawback with that game) and some battlefield objectives from their most excellent "Terrain Crate" scenery range. But the important part at this stage, as any good gamer knows, is the miniatures. How do they measure up as gaming pieces and painting subjects? It turned out to be a mixed bag (or rather box...) across the board. We were all impressed with the sculpts, don't think anyone was disappointed! There seems to be plenty of detail, even on the most basic troopers, which makes them all feel individual. Great start for a skirmish game. The problems seem to be the physical make up of the figures. An early complaint was a lack of instructions for building the minis, although many of them have shaped pegs and slots which indicate which arms go where. There isn't a lot of flash on the models, but there are a lot of badly positioned mould lines (seriously, across chain mail?!) which has become a bugbear for everyone when it comes to painting. Another big discussion point was the bases. Mantic used a system which involved models having a moulded round base attached to the feet which slotted into a circular space in a 20mm square base. We have the same bases, but most of the minis don't have the round base attached, which may lead to some inventive ways of fitting them on!

DSCN3906 - David Mustill.JPG

For my part, I was really happy with the miniatures, although less happy with putting them together. My two boxes yielded three different types of miniature material: Resin, hard plastic, and something called PVC plastic. The resin sculpts are stunning, and I am slightly concerned about being able to do them justice with a paintbrush! I did have one very flimsy part which snapped off while I was trying to clean some tiny flash lines from it, which I have glued and shored up with a tiny drop of Vallejo plastic putty! The hard plastics are great, if a little less dynamic than I would have liked, and went together with a drop of polystyrene cement on each joint. A few minutes on each model gave a pretty satisfying range of basic soldiers. The problems all seem to be with the PVC stuff. For a start, poly cement doesn't work on it! After an hour of fiddling about trying to put them together I picked them up to get them ready for spray undercoating only to have arms, heads and weapons falling off in my hands... Half an hour of angry mumbling and superglue finally got me to the point where they were ready to prep for painting. The lack of instructions let this set down, even just a note on the back of the box about the different materials would have helped. A look through the Mantic site let me know what materials I was dealing with, but gave me no info on adhesives required for each. Overall we have had a positive start with the miniatures part of the project, next up comes the gaming side, which will be the real test for Vanguard. Hopefully the good vibes will continue!

vanguard-main-art-high-res - David Mustill.jpg

Ivadd knelt before the elders, his head bowed in reverence. The Holy Confluence sat at a semi-circlular stone table facing him discussing his future. Candles flickered around the entire span of the round wall in the great hall, with barely a gap for the doorways. Great battle flags of the Houses of Basilea hung behind the Confluence, waving faintly as the warm air rose around them. Other members of the Order and Priesthood stood behind him, listening to the pronouncements of their leaders.

"Several months ago our astronomers noticed a change in the heavens. A new star appeared in the constellation of Cronus. It was as if an eye had opened in the head of the Great Celestian. Over time the eye has become brighter, a sign that we are favoured by Cronus, and we have been calling for the Shining Ones to share with us it's meaning. It has been discerned, however, that it is not just getting brighter, but also nearer to Pannithor. Our scholars have estimated that it will arrive within the next three months."

"Brother Ivadd, you are tasked with finding and securing the Eye of Cronus for the glory of Basilea. You will form a warband and patrol the fringes of the land, scouting the area and engaging with our enemies, honing your skills until the time comes to claim the Eye. Engage the Palace, the Priesthood, and the Sisterhood to recruit your forces. We will show the world a united front, that none shall topple our might! When you know the location of your objective you will send word to The Golden Horn, and our armies will march forth to support your claim. May the Shining Ones watch over you."

Ivadd stood, and crossed his right fist across his body.

"It will be done"

David Mustill

MHWC Vanguard - Steve, Post 1

As previously stated by my fellow club members, the MHWC was invited to take part in Mantic's 'Your Club, Your Story' promotion for Kings of War Vanguard. Like everyone else, I was very excited to take part. After all the goodies were divided up, I found myself back at home with a Trident Realm starter box and 2 blister packs, along with a rulebook and other odds and ends. In all it was a very generous and more than enough to get our teeth into. I read through the Trident Realm section in the rulebook, and I will quote it here :

"The Kingdoms of the Trident Realm are proud and territorial, and can commit to violence with little provocation. The lord of any land-bound territory would be wise to treat their inlets and coasts cautiously, lest they stir the fierce Nerticans who claim them as their own. When the Trident Realm stirs, the very seas boil - storms rage, waves crash upon coastlines and the tides rise only to retreat, revealing the Nertican host, water cascading off shells and armour and ready for war."

In my head, the Trident Realm is neutral. Not in a 'we help whoever needs our help' sense, but more of a 'we ally only when it suits us - do not be in our way' sense. I already had a theme for basing (which is something I usually struggle with!) I decided that I wanted my creatures to be emerging from a tropical lagoon, ready to engage the enemies of their intentions!

 I started off rummaging through the boxes, assembling figures and pondering where I could draw inspiration from. After assembling my figures, I decided that I wanted to go down a tropical/more striking colour scheme for my assorted water based warband. So, I started searching through the internet for different animals I could use to get my painting off the ground.

img2-2.jpg

 After much searching and debating, I had my inspiration images prepped and ready. My 2 Thuul were inspired by the Giant Pacific Octopus. The striking red of the animal stood out to me, and I thought they would look great as henchmen.

Blue-Ringed-Octopus-4-650x425.jpg

The spellcaster however, needed to look more special. As such, I decided the Blue Ringed Octopus would be a great base for a paint scheme. The striking blues coupled with the vibrant yellows work well to indicated a certain level of ‘mysticism’ within the creature.

DSC_0116.JPG
poison_frog_strawberry.jpg

Then came the Riverguard. I knew I wanted to make the Riverguard look more tropical and settled on a Red Poisoned Tree Frog. The combination of blues and reds looked great as a scheme, and I thought the inclusion of black leather gave a nice balance for the two colours.

red-eyed-tree-frog_thumb.jpg

The Treeleaper was different though. I had the idea that it was a bit more 'stealthy', less striking. In my head the name is literal - the Treeleaper hides in the branches of trees and pounces on unsuspecting foes below. I settled on the Red Eyed Tree Frog for my Treeleaper. I think it came out pretty well, with a nice balance of colours that isn't too striking to not be at least a little stealthy.

DSC_0117.JPG
DSC_0114.JPG

The Naiads were slightly more troublesome. It took me a long time to decide how I wanted to paint them - the only thing I could decide was that they would have blue skin! I knew I wanted to include a fair amount of gold on them, and as painting continued I decided on the notion of the fins actually being ornamental and not actually organic. This had them become silver - maybe at some point the Naiads in my force devolved in some way from the norm, or perhaps they covered their fins in metal to protect the weak flesh there. The pale bone colour idea came from painting shells on the other figures. All in all, it's quite a cold look for my Naiads - something that fits with my understanding of a neutral race that comes from the waters to enact their will on the land.

DSC_0112.JPG
1200px-KreeftbijDenOsse.jpg

 The Giga came next on my painting list. This one was fairly simple for me. In my eyes the model looked more like a Lobster than a Crab, so I went ahead and found an image of a lobster to use as a reference.


asian-small-clawed-otter.jpg

Having finished my force, I discovered an option on one of the unit cards - an Otter Bevy! I absolutely love otters, and as soon as I knew I had the option to have some I absolutely needed a unit! Unfortunately, there were only 2 Otters on the sprues I got in the box, so had to be a little creative. Thankfully I had a spare Thuul head, and I thought 2 otters overlooking a tentacled beast emerging from the waters would be a neat substitute.

DSC_0118.JPG


And that's my painting journey for the Kings of War Vanguard! Up next will be some games and thoughts  on the rules themselves. Thanks for reading!

Piracy on the Seas!

Club member Alan speaks on his gang of marauders :

Pirates!

The trouble with the word, Pirates, in wargame circles is that it conjures up very specific ideas. Its all small gangs skirmishing in inns or on the deck of boats that are normally far too small. Nothing wrong with such games of course, they can be lots of fun but, there is another way.....

the army - Alan Abbey.jpg

I decided, mainly because I had a pile of new figures from Wargames Foundry that hadn't actually cost me anything (long story, tell you later), that I really didn't want a series of small gangs. I wanted a force to be reckoned with, something that reflected the big gangs and crews of the 17th century, the full ship crews, the smuggler bands that could number in their hundreds! My first thought was to build such a force for the Donnybrook rule set. This is a handy set of rather bloody rules from the League of Augsburg, I had already built a military force for this a couple of years ago. But, after being rather impressed with the new range of Osprey rule sets, eventually settled for Pikemans Lament. These rules are essentially based on the popular Lion/Dragon Rampant set so work well. Once I took a close look at what figures I had available and checked with the points system the rules used, I seemed I had enough to build a good sized twenty four point army.

Pikemans Lament uses units of twelve or six figures, quite handy as the Wargames Foundry figure packs are usually of six figures. I worked out that I could build half a dozen or so units and, given the points system and the variations available, still be able to play around and build several versions as a game may require. I suppose that in effect I did end up building several mini gangs, each unit becoming a distinct crew with its own leader and standard. Such unit leaders and flags play no real part in the rules but the concept lent itself well to the narrative of a pirate army. A confederation of convenience, perhaps? So, here is what I ended up with....

The Leader is Red-beard Rum with a unit of twelve raw musketeers.

Red-beard Rum

Red-beard Rum

He is supported by two other such units headed by Molly Black-heart McSweeney and Chopper-Tom Harris.

Molly Black-heart McSweeney

Molly Black-heart McSweeney

Chopper-Tom Harris & band.

Chopper-Tom Harris & band.

A fourth musketeer unit is provided by the government turncoat and sometimes merchant adventurer Sir Thomas Gage.....booo, hisss etc.

Sir Thomas Gage

Sir Thomas Gage

A unit of pikemen commanded by Willy Wright and a bunch of psychotic swordsmen (clansmen, in the rules) lead by the African 'Sweet' Brothers complete the large units.

Willy Wright

Willy Wright

The Sweet Brothers

The Sweet Brothers

A unit of six Forlorne Hope elite troops are lead by Mad Stumpy Jones and a six figure Commanded Shot unit is lead by Antigua Jack....even enough casualty figures to provide nifty looking game markers.

Mad Stumpy Jones

Mad Stumpy Jones

Antigua Jack

Antigua Jack

The ungrateful dead

The ungrateful dead

I have also recently added a cannon and crew but no pics of that, sorry. As an army for Pikemans Lament they work rather well and certainly add a little flavour to a game, something a little different than your average New Model Army force certainly!

Alan Abbey